
Search the Knowledge Base
Micro:Bit Motion Detection Tutorial
Tutorial Aim:
The Aim of this tutorial is to interface the HC-SR501 PIR motion sensor with the micro:bit microcontroller.
PIR sensors are invaluable for detecting motion in various projects, and with the micro:bit’s adaptability, integrating them becomes seamless. Throughout this guide, we’ll demonstrate how to connect the HC-SR501 sensor to the micro:bit and program it to detect motion efficiently.
Requirements:
This tutorial makes use of the following components:
- Microsoft MakeCode for micro:bit
- Micro:bit V2 Microcontroller
- Micro:Bit IO Dupont Terminal Expansion Board
- 3 Female to Female Jumper Wires
- HC-SR501 PIR Motion Sensor
Pin Layout:
The pin layout is shown below.
| Micro:Bit Pins: | Sensor Pins: |
| GND | GND |
| 3.3V | VCC |
| 8 | OUT |

Setup:
Please refer to the diagram below for wiring. Please note that the circuit diagram uses a different Micro:bit shield than the supplied in our package, despite this, the wiring is the same.
- Connect the PIR motion sensor to pin 8 on the micro:bit using the Female to Female jumper wires
- Open Microsoft MakeCode
- Plug in the micro:bit to the computer

Code Walk Through:
Determining if the sensor detects motion:
The sensor will output 1 (signal High) if motion is detected, & if not it will output 0 (signal low). Using this we can determine if motion was detected and display a stick figure on the Micro:bits LED grid as well as playing music. The code for this section will be inside the ‘forever’ block.
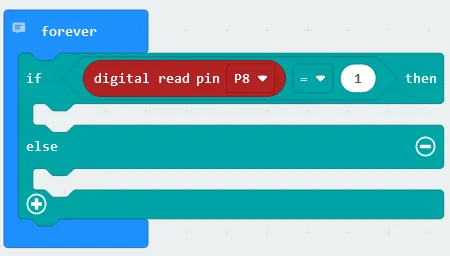
Creating conditional blocks: In the Logic tab select the “if-else” conditional block and place it inside the forever block.
Checking for motion: In the Logic tab select the comparison block “0 = 0” & change it to “digital read pin 8 = 1”, where “digital read pin 8” can be found under the Advanced tab under the Pins tab. Place the code snippet inside the if statement inside the conditional block.
Displaying a stick figure & playing music when motion is detected:
When motion is detected we can display a stick figure on the LED grid as an intruder alert as well as play music. The code for this section will be inside the ‘forever’ block.
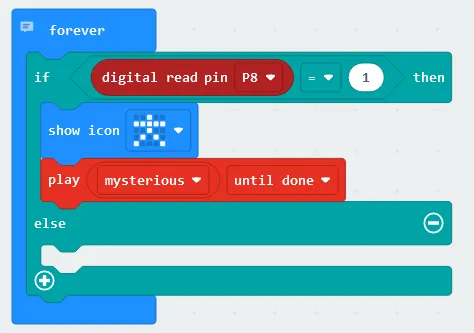
Displaying a stick figure on the LED grid if motion is detected: In the Basic tab select “show icon” and select stick figure before placing the code snippet underneath the if statement inside the conditional block.
Playing music if motion is detected: In the Music tab under the micro:bit (V2) section select “play (noise) until done” and change it to “play mysterious until done” before placing it underneath the if statement inside the conditional block.
Displaying a line when no motion is detected:
We can indicate that there is no motion detected by displaying a neutral horizontal line.The code for this section will be inside the ‘forever’ block.
Displaying a neutral line when no motion is detected: In the basic tab select “show leds” and click on the squares in the grid so that a straight horizontal line appears. Place the code line underneath the else statement inside the conditional block.
Pausing the code: In the Basic tab select “pause (ms)” and set it to 500 before placing it inside the forever block.

Flashing the code onto the Micro:Bit:
Make sure the Micro:Bit is connected to the computer
On the bottom left corner, click the “Download” button and follow the prompts
Output when the sensor is triggered:
A stick figure is displayed when the sensor is triggered, otherwise a flat line is displayed on the LED grid.

Python Code:
Entire python code for the tutorial:
Simulated PIR Motion Detected
Displaying the Micro:Bit’s output for when motion is/isn’t detected.
Please note the input for this simulation is pin 1 instead of pin 8 for illustrative purposes.

Downloadable Content:
Please find this tutorial’s python & hex file for Microsoft MakeCode on our Github page.
Credits:
- Microsoft
- The Micro:bit Community
- The STEM Community